Pop on over to Eraserqueens blog, she is having a wonderful giveaway in honor of the new workshop that she's working on
http://eraserqueenstudios.blogspot.com/2012/01/collage-extravaganza-giveaway.html
We all love freebies, and her artwork is phenomenal! She also frequently contributes to Art Trader Magazine. If you haven't heard, Art Trader Magizine is basically a free web based magazine that comes in a PDF format. Easily downloadable and full of wonderful artwork and reading material, I highly recommend that you at least check it out. Visit http://www.arttradermag.com/magazine/ . Also, if you use an iPad, be sure to save it to your library so you can flip back to it in the future.
Happy Reading!

Tuesday, January 31, 2012
Monday, January 23, 2012
Free Tutorial: Upcycled Cookie Tin Using Mixed Media Techniques
This tin is a perfect container for your art supplies, as well as a wonderful gift item for any holiday. Fill it with pencils, cookies or use it as a special container for that just perfect birthday gift..this is truly a versatile container. What makes it even better is the fact that it is up-cycled and kept out of the trash dumps.
I listed all the supplies I had used when creating it. Knowing that you might not have the same exact things at home in your stash, I encourage you to be flexible. Don't have the Letraset markers? Use water colors. Just use whatever items you have at home.
Supplies Used:
Used clean tin (mine was from Aldi)
Soft to medium lead pencil
Acrylic pencil eraser (try to avoid the pink school erasers, they have grit which will eat into the surface)
Flexible sanding material, medium grit
White gesso (I used Golden brand)
1" wide flat brush (inexpensive is wonderful)
Small round water color brushes
Old text paper (I used old dictionary pages)
Liquid acrylic paint
Matte gel medium
Letraset AquaMarkers
Prismacolor colored pencils
Water-soluble crayons
Misc. cloth rags
2 Jars of clean water, one to wash your brushes, one kept clean
Heat gun (to speed up drying if needed)
This tutorial is a work in process, I will be making corrections and Adjustments in the next few days.
Step One: Sand

Using a flexible sanding media, sand all areas that you wish to be painted or altered. Pay special attention to the inside corners on the lid. You basically want to eliminate all shiney surfaces, which will make the gesso stick better and give the tin surface more tooth to hang on to the gesso.
Step Two: Gesso your surface

Grab a wide brush of your choice and start to cover the entire surface with a healthy layer of gesso. You may need to go over an area a few times to be sure the layer holds. Don't be afraid to leave brush strokes in your coverage. Brush strokes are OK and add plenty of character to the surface of the tin.
Step 2 b: Let the gesso dry completely

You may need to add a 2nd or 3rd layer depending on the brand of gesso you used. Also, here you will find if you sanded the surface well enough. If you look carefully you'll see some minor cracking in the corners of the lid in this picture. I missed those spots and the gesso didn't stick to the lid surface. I had to reapply a second and third layer to be sure the original surface was covered.
Step 3: Collage!

When all of the surfaces are completely dry you can apply your text pages to the sides of the tin. Using the matte gel medium and working in sections, apply a layer of text to the tin. This is a wonderfully messy step and fingers are the preferred tool to use :) Paint the tin with a layer of gel medium, then add a section of text. Be sure to smooth the paper down with your fingers to remove any air bubbles beneath. Move on to the next section and repeat, this time rotate the text so that it is aligned in a different direction. As you move along be sure to trim as much extra material off the edge of the tin, it should be slightly damp and somewhat easier to tear off. Once you have the sides of the tin covered in your text paper, and if you haven't already, coat the entire surface with a final layer of gel medium to seal the paper. Let dry overnight. Testing the surface to be sure it is completely dry, use your fingers and rub on a coat of gesso over the text. Use a little bit of water to thin it out and before it starts to dry, take a clean cloth to rub off the gesso. I know I know, put it on ..take it off? Yup :) Basically you are covering the area and taking off the gesso on the "high" areas. The gesso will settle into the cracks and crannys . This tones down the print a bit. If your print is lighter in color, then go the opposite and use a darker watered down acrylic and wipe off.
Step 4: Draw your design
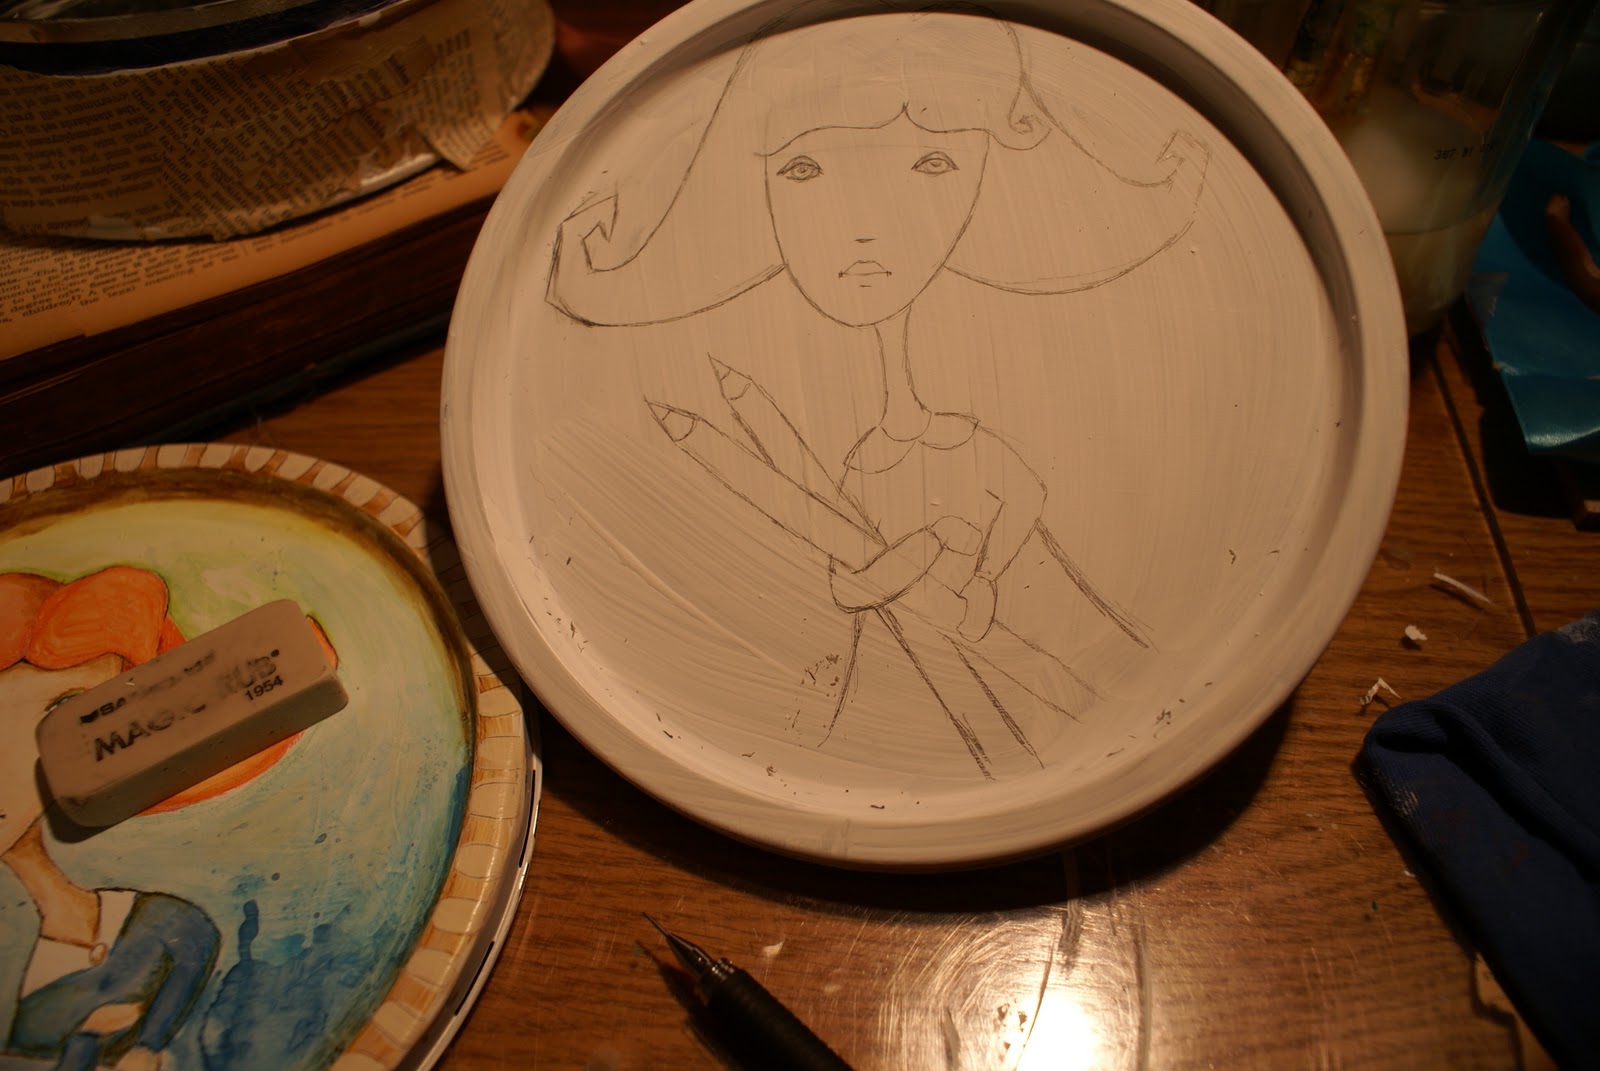
Using your pencil, either trace or directly draw your design onto the tin lid. Be careful of how hard you press on to the lid with your pencil, harder led will tend to etch into the gesso and possibly peal up the surface. No biggy if this happens, simply grab your brush and reapply a layer of gesso to cover the area. Once dry you can go back over to adjust your drawing.
Step 5: Time to color

Using your water-soluble crayons, start coloring in areas. The more color you lay down, the darker or more saturated the section will be. When you think you are satisfied, grab your small water color brush, dip it in the water, tap off any extra on a cloth and start to blend the color in one section at a time. Be sure to work in areas that are not next to each other, to eliminate the chance one color will bleed into another. You also need to remember that the more water on your brush, the more liquid the color will have to dissolve in. The "wetter" the area, the more the color will settle via gravity. This may be an effect you are wanting to create. Looking at the picture above, you can see the dark blue area, here I used a liberal amount of water and rotated the design upside down. I let the color run on the lid to create a more organic effect. Always be sure to let each section dry thoroughly before working on the section next to it.
Step 5b: Additional layers of color

You may need to lay additional color on to your design. Here I felt that the dark blue wasn't enough. I added more crayon and dissolved it with a bit more water, you can actually see the wet drips in the photo. I also slightly rubbed off some of the blue closer to the bottom to give it a slightly transparent look. As I waited for the blue to dry, I also took this time to add additional shadowing and color with my prismacolor pencils. I used a reddish orange to deepen the darker areas of her hair, as well as (when dry) a darker blue to reinforce the shadowy areas of her blue dress.
Step 6: Final touches

This is the "catch-all" step. On the lid edge lay down a juicy layer of Letraset AquaMarker. Don't totally saturate the edge area with color because you then need to rub it down with your finger to give it a smudgy grungy look. You may want to use a damp brush to it to wet it down slightly and make it smudge easier. Once dry use the liquid acrylic color to make the light stripped areas and outlined them with pencil. Again let the layer dry completely. Next, use the same Letraset marker and draw a line on the inside edge of the lid. Using a clean damp brush again, smudge the marker color to fade into the lid design making sure to try and eliminate the actual line. This is also a good time to add in more color around her hair with the watersoluble crayons to bring out her hair color. If needed you can tone down the color in the background as well ( In this picture you can see in the area around her neck, I rubbed in some watered down gesso to lighten it up a bit). So, after your adjustments have dried you can now use your pencil once more and touche up the lines in the drawing. When you are satisfied and feel that you are done, go ahead and spray a heavy layer of final fixative to all the painted surfaces. This seals it and insures that the color will not rub off in the future.
All in all this project may take you a few days to complete. The major time killer is letting the different layers dry completely. But, if you are short on time, you can use a heat gun to speed up the process a bit. Just remember, it is a metal tin and it will get hot if you hold your heat gun over it long enough. Be careful.
Enjoy
Comments are always welcome. If you should have any questions, feel free to post them and I will try my best to answer them.
Friday, January 20, 2012
Product Review: Letraset AquaMarkers
After hearing some buzz about these markers on the internet community, I decided to give them a try. Having worked in water based media and they sounded very appealing to me. After a little bit of research, I found that the company that manufactures them is based in the UK. Knowing that international shipping can be brutal on a limited budget, I decided to purchase them from Dick Blick which is a local art supply company and my markers arrived in just shy of a week.
Both sets of markers arrived in a nice hard clear plastic case. Actually I was quite impressed with the design of this case. Why does it matter? It matters because you can easily see each individual marker from the outside with no package lables getting in the way. This makes for a quick choice in color selection. Also, the package opens up flat dividing the set in two, which provides a stable flat platform to hold them while you work. I would most definitely recommend that you keep the package/case for storage or for travel.
 Ok, now on to the markers. Each marker's label has a representation of the actual color and the name printed on to it. The printed name I find is a bit on the small side and I do wish they would have used a slightly larger font. These markers have a fat and a thin pointed tip on each end, the thin tip is the pointed cap, the thick/fat tip has a blunted cap. When I tested the markers on regular drawing paper each fat tip generously laid down a thick juicy line of color, as well as the thin tip of each. The claim to fame with these markers is their ability to be blended, either with water or with the blender pen that comes with each set. Here comes the big "But". Yes these blend easier than most other waterbased markers, However, you must use them on a waterbased ground. They did not blend at all on regular drawing paper. In fact, due to their juicy nature, they actually made the paper "pill" and tear really easy. I suggest that you wait for each application to dry fully before going over with another color. On watercolor paper they worked beautifully. Each color was easily manipulated either by the blender pen or by a wet water color brush. I do not suggest using them as a "wet on wet" technique, this seems to mess up the tips a bit. If you wanted to use a wet on wet technique, you could use a dry brush on the tip of the marker and load up the color to be applied. You could also lay down a section of color on a scrap piece of watercolor paper and take a damp brush to it to pick up the color. As for the blender pen, it is basically just a colorless version of the marker and I suggest a light hand when trying to blend colors or make corrections by lifting color from your work so as to not overwork the paper and tear through it. If you do pickup a different color on your tips, it is super easy to remove it by simply wiping the tip off on a scrap piece of paper.
Overall thoughts? On the right material, these markers are wonderful. They are more versatile than others, juicy, bright, but yet have some limitations. The packaging was well designed and worth keeping for storage and transport. They do seem a bit on the expensive side, but there really is no marker that functions like them on the market. Two thumbs up in my book!
Shopping Advice incoming! Research your prices. The pricing for these beauties doesn't vary much actually, but it's the shipping that will get you. Assuming that international shipping is more expensive I decided to visit a local Dick Blick..they did not have them in the store (the girl looked at me like I had a second head when I mentioned "watercolor markers" so make sure you know the name), I ended up ordering from them and paid a $9 shipping fee. Upon researching for this article I found that Letraset in the UK is actually offering free shipping to the US ! Also, they have a promo going on where if you buy 6 you get em for the price of 5. With that being said, Dick Blick also came through for me when 4 of the markers arrived "dry". They immediately shipped out replacements at no cost. Also, ordering through Dick Blick you can put your dollars towards your favorite online community if you order through their links on the actual community site, so that they can benefit from your purchase as well.
I do hope this review answers any questions you may have about the Letraset AquaMarkers and makes your purchasing decision easier.

Here is an example of a mixed media type application of the markers. I used them in addition to the watercolor crayons and pencil on this tin.
Subscribe to:
Posts (Atom)